Friday, March 17, 2017

Roland MC-4 push button replacement and toggle switch repair


I recently purchased a Roland MC-4 sequencer from a friend for a very good price (about half of the going price). It was basically working fine except for a couple of minor gripes: 1. The "0" keypad button had a broken shaft, so the button cap that's supposed to go on top of the x-shaped shaft was loose. 2. Most of the push buttons needed some "after touch" to work properly, some more, some less. 3. The two-position momentary "mode" toggle switch was missing its return spring. In fact, as I learned from the previous owner, the original part had been replaced with a toggle switch that never had a return spring. That means that every time I pushed the toggle switch down I then had to manually return it back to the upper position, otherwise the MC-4 would freeze before the toggle went back up (which would happen automatically if a return spring is installed). Why Roland would use a toggle switch when they could simply have used a push button is beyond me.


Roland MC-4 post-restoration

So I asked my friend and personal technician Mr. K from the Ruhrgebiet if he could fix these issues with my MC-4. He agreed: Challenge accepted! He soon realized that tracking down the original ALPS parts for the push buttons would be very difficult and expensive. He opted for Cherry computer keyboard buttons instead. They are readily available and are a proven industry standard with many thousand life cycles! It turned out that the Cherry buttons have different physical dimensions, especially the metal contacts that are supposed to go through the holes in the mainboard. So Mr. K devised a cunning method of inserting an adapter socket between the board and the base of the Cherry button: One adapter per switch. That's a huge amount of work involved and hours of soldering fun guaranteed! The button caps needed to be glued on top of the shafts since the "x"-shaped ends of the shafts are a bit smaller than on the original ALPS ones.


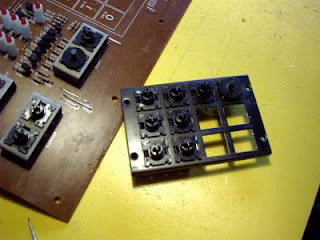
Roland MC-4 with broken ALPS push button

Roland MC-4  numeric keypad with original ALPS push buttons

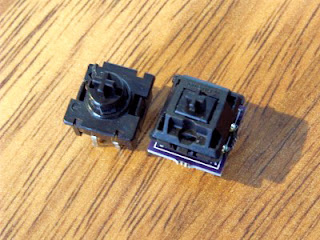
Roland MC-4 original ALPS (left) vs. Cherry replacement (right) push button

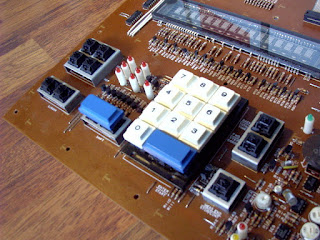
Roland MC-4 with new Cherry replacement push buttons

Like we say in German: Said, done! Mr. K bravely accomplished this Herculean task and replaced all 21 push buttons. Now they work as new! Maybe even better...

The momentary "mode" toggle switch with the return spring was a tricky part to track down. But Mr. K made it happen! Since it was impossible to find a 2-position toggle switch with return spring, he instead came up with a 3-position toggle switch with return spring on one side. So, the toggle would latch in the top and in the middle position but return to the middle (thanks to the return spring) when pushed to the down position. Just what we needed! The action of the toggle switch is now momentary, like on the original MC-4! I suspect that the original part is actually the same 3-way toggle switch that we used, so Roland themselves may have used this 3-position toggle switch in this peculiar way. What a weird design!


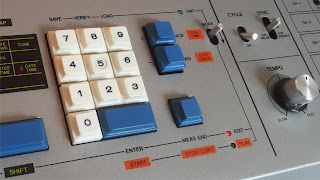
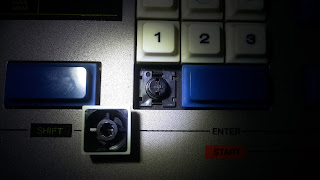
Roland MC-4 numeric keypad and 2-position "mode" toggle switch

Mr. K also recapped the power supply. That's his philosophy: When you have a vintage synth on your bench, you should replace the ELCOs before they dry up completely and possibly damage your machine. After all. in the case of the MC-4 the ELCOs were more than 35 years old!

My Roland MC-4 now looks and feels amazing and operates beautifully. Thank you Mr. K!

Sunday, February 19, 2017

Hyboid's adventures at Schnittstelle vinyl cutting studio


Being able to attend a lacquer cut is an awesome experience! I have mastered quite a few releases for vinyl but never got the chance to attend when they are cut on lacquer. Until recently when I went to Schnittstelle in Berlin for my next release: Hyboid - UFOs over Berlin.


What is a lacquer cut? When you want to make a vinyl record, your music must be cut into a so-called lacquer: basically an aluminum plate covered with nitrocelulose. Using a cutting lathe (the rather large machine used to cut the lacquer, looking like a gigantic turntable) you engrave the audio signal into the lacquer layer using a cutting-head which in principle works the same way as record player pick-up, only in reverse. These cutting lathes are bulky but very delicate equipment. Maintaining and servicing them is an expert job! The Cutting heads are even more fragile and damn expensive. That's why cutting lathes have several levels of protection making sure that the audio signal does not damage the cutting head. I will go into that later.

Once the lacquer disk has been cut (one for each side of a vinyl record!), it goes into what is called the plating or galvanic stage which involves several steps of metal coating and basically making a physical copy of the master lacquer. You end up with a metal duplicate of the lacquer disk which is then used to make the metal stampers for the actual vinyl pressing run. A very work-intensive process that requires a lot of diligence to ensure an optimal result.

Now back to the lacquer cut. Many pressing plants have in-house cuting facilities. The advantages are obvious: less cost for the customer and less hassle for the pressing plant in case something goes wrong or the customer wants a re-cut. I have opted to use a dedicated cutting studio this time because I wanted to have more control over the cutting process. After all, Schnittstelle is basically around the corner from where I live. I asked Andreas Kauffelt, the boss at Schnittstelle, if it was OK if I could attend the cut. He agreed which is a super nice thing because customers don't usually attend the cutting session. I really appreciate the opportunity!
Andreas is incredibly knowledgable and a very nice guy. I learned a lot from him. Since I master my own releases, it is always incredibly important to know how your audio material will change when cut and later pressed on vinyl. You probably know that there is a direct relation between the duration of a vinyl record and the volume at which it can be cut. The shorter the program duration, the louder you can cut the vinyl, since the groove takes up more space on the disk if it is louder. Very simple. So, taking into account the duration of your material is an important aspect. In my case, each side of the record has about 12:30 minutes which transfer onto a 33RPM side without any problems and with a decent level. I could also have cut it at 45RPM which has a better high-frequency response, but it would also have meant a quieter cut. So I chose good-old 33RPM.
I always pay attention to the side band of the stereo mix when mastering my releases for vinyl. In case you don't know, the stereo signal in vinyl records is encoded in M/S stereophony (Mid-Side), where the mid signal (the mono sum) is engraved horizontally on the disk, whereas the side signal (containing everything that is different from the mono signal) is cut vertically. Neither the cutting head nor the pickup on your turntable like it when the side band has too much energy in the low end. Strong out-of-phase signals roughly below 200 Hz, for example from chorused bass lines or boomy stereo reverbs, should be avoided. If you don't pay attention here, the cutting head may get damaged or the resulting groove could be interrupted and cause the needle to skip. But also taming the highs in the side signal can make sense. Even the mono signal (M band) should be low-cut to avoid unnecessary deep frequencies. The high end above 16kHz shouldn't be too pronounced either since the stylus will have trouble picking up all the high frequency information from the groove, especially in the inner part of the record. Since a vinyl record rotates at a constant speed, the information in the center is much more condensed than on the outside of the record. So, near the label towards the end of your record, it gets increasingly hard for the stylus on your pick-up to follow all those high-frequency wiggles in the vinyl. That is why the highs often sound muffled in the last track of a vinyl record. All of this (and much more) needs to be considered when mastering for vinyl.
So, after loading my master tracks into his DAW, Schnittstelle boss Andreas Kauffelt thoroughly analyzed the audio material with his vector scope, FFT analyzer and level meter and found nothing to nitpick on. I took that as a compliment! He then took a partly used lacquer disk to do a test cut of some portions of my audio material to see how it would sound on different parts of the disk at different levels. That was actually pretty interesting. It works like this: you take a lacquer disk that has been used before but still has enough blank space to cut some material on it. Then you feed your audio signal into the cutting lathe and listen back to what you are presently cutting with a turntable pick-up right behind the cutter head. The pick-up plays back your vinyl groove only fractions of a second after it has been cut. Listening to a record doesn't get any fresher than that, for sure! Since Andreas's desk has a nice monitoring switcher/mixer, he could easily match our playback levels so we could A/B both signals to compare how the audio will sound when played back from the DAW vs. from the lacquer disk. My "UFOs over Berlin" EP transfered nicely to lacquer. The test pressing which arrived two and a half weeks later sounds dope!

AC07 "Hyboid - UFOs over Berlin" test pressing